3D - In your sketchbook, draw your favorite work by British artist Henry Moore. Show it from at least two different sides. You will have to look for works that show two views or look for two different images of the same work. Use pencil or ink and make sure to add shadows to show that it is 3D.
2D - Find a work by Georges Seurat that uses dots or dabs of color. Recreate one of your favorites in your sketchbook. Use a full page and you can use any material you like. If you choose the "Sunday Afternoon" piece, then you can opt to do just a section of it, because it is so complex. This process of using small dabs of color that sit next to each other without actually blending is called "optical mixing". Look at Seurat's work as an overall image then zoom in and look at one particular section. Notice how he used colors. This is the process that we will use for your self portraits. Most of y'all did GREAT last week. It should take at least two hours.
Tesch - Choose one of the Dutch masters like de Heem, van Aelst, van Beyeren or Claesz and recreate a still life that involves life and death. Most of these were done around 1620-1680 and are highly realistic. Several types of subject were recognized: banketje were "banquet pieces", ontbijtjes simpler "breakfast pieces". Virtually all still lifes had a moralistic message, usually concerning the brevity of life – this is known as the vanitas theme – some artists use an obvious symbol like a skull, or a less obvious one such as a half-peeled lemon (like life, sweet in appearance but bitter to taste). Flowers are wilting and food shown in various stages of decay.
Monday, September 15, 2014

Monday, September 8, 2014
Art 2 - Masks from around the world
Masks are a very interesting topic. They can be used to mask our real physical faces for fun but can also been used to reveal our inner selves. In rituals, shamans or role players use masks to act out mythical characters, archetypes or personas (persona literally meant “mask” in ancient Latin). We all have these characters either individually or collectively dwelling in our dreams or inner worlds. One good way to get to the meaning of these characters is to bring them out into the open. The ancient world used masks to symbolize and convey personalities and emotions that defined their cultures. Some cultures have come up with some very distinct styles but some similar types of masks can be seen across cultures worldwide. For example you can find many skulls, demons, bird-men or wolf-men all over the globe. Here is a small sample of masks.

Himalayan

Chinese

Chokwe Tribe Africa
Himalayan
Chinese
Chokwe Tribe Africa
Ceramics - White clay
What is the difference between working with white clay and red clay? Which do you prefer?
Art One - Mandala video
Tibetan monks create a mandala (sand painting) as a ritual. Watch this short video. What do you think about the image and the symbolism?
http://www.youtube.com/watch?v=9QItAyepAnI
http://www.youtube.com/watch?v=9QItAyepAnI
AP/ART 3 - Friday assignment due 9/12

2D - recreate a portrait by American artist Alice Neel

3D & Tesch - look at the assemblage boxes by American artist Joseph Cornell - put some things together in a box type form (any kind of container) to create your own assemblage. They can be related to tell some sort of story or they can relate in another way.
Tesch, you will be drawing it :) and will start the drawing next week.
3D students need to photograph the box and add to your sketchbook.
Tesch, bring in the box.
Wednesday, September 3, 2014
AP/Art 3 - Sept. 5 Friday Assignment and Due Dates
ALL AP and Art 3 projects are due next Friday 9/12 - stipples, bell construction and Tesch's bird. 2D students who are stippling will definitely need to take them home this weekend! See Mrs. Butler to get a folder.
Friday assignments:
AP students - complete your cover design for your sketchbook.
Tesch and Art 3 (2D) - reproduce a work by Jasper Johns
Art 3 (3D) - Find objects around your home, stack them and construct a bell form. Photograph it (either with a camera or your phone is ok for this assignment), print it and tape it into your sketchbook. You can then disassemble it. Do not bring it to school. I only want to see the photo of it in your sketchbook.
Art Two - More Colored Pencil examples
Your colored pencil drawings will be due next Wednesday 9/10. You may need to take it home over the weekend to get it closer to being finished.
Below is a little inspiration. What do you think of the work and the process?


Below is a little inspiration. What do you think of the work and the process?

Ceramics - Day of the Dead

https://www.youtube.com/watch?v=sUUAgEWeYeI
Follow the above link and watch the short video about the Day of the Dead.
Tuesday, August 26, 2014
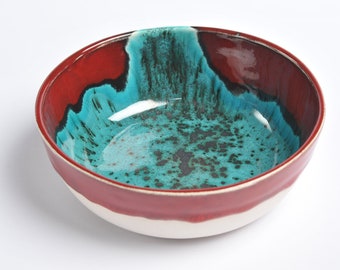
Ceramics - Glaze
Notice the glaze and colors on the ceramic pieces below. These artists used more than one color. Which do you like?


Art 2 - Colored Pencil examples
Below are examples of art made with colored pencil. Which do you like best? Note the color, darks/lights and techniques.


3D AP and ART 3 - Bell and Totem
Look at a variety of bells and totems online and the images below. You will use clay to create a base and "beads" that will be connected with a metal rod called rebar. These sculptures can be based on animals (like totems), humans, plants or be totally non-objective. See below on the blog for your Friday assignment. You will need to do this before you actually begin so that you have a clear plan. These bells and/or totems can be any size because you are working in parts. You will have two weeks to construct them. We will allow them to dry then move on to our next project and come back to them for glazing and assembly.
The first three images were made by FPD students - Lizzie Lisenby, Kathryn Lyles and Katherine Bolles.


The first three images were made by FPD students - Lizzie Lisenby, Kathryn Lyles and Katherine Bolles.
2D AP and 2D ART 3 - Stipple
These are three small drawings by Bentlie Grice, Caroline Stroud and Emily Sparks. They were "sketched" first in Photoshop, transferred to Bristol board then filled in using only ink dots. The process is called STIPPLE. It is time consuming but the results can be stunning.
Create a Photshop document that is 8.5x11" (either vertical or horizontal). Layer multiple animal images. It can either be from the same type of animal or a totally different one. You might even add a textured layer for interest. Keep in mind that these will be only black and white so go ahead and take out the color by going to "Image" at the top of the Photoshop screen and then "Adjustments" then you can adjust the color saturation. Make sure that your "sketch" had enough contrast too. You will need lights and rich darks.


Create a Photshop document that is 8.5x11" (either vertical or horizontal). Layer multiple animal images. It can either be from the same type of animal or a totally different one. You might even add a textured layer for interest. Keep in mind that these will be only black and white so go ahead and take out the color by going to "Image" at the top of the Photoshop screen and then "Adjustments" then you can adjust the color saturation. Make sure that your "sketch" had enough contrast too. You will need lights and rich darks.
TESCH!!!! Watch this
Your next assignment is a stipple - Yes, honey.... it's good for you! But watch this first then decide how you will attack it. The imagery should be animal based. Feel free to Photoshop "sketch" first, but then go for it. Keep it black and white.
http://www.ted.com/talks/phil_hansen_embrace_the_shake?source=facebook#.Ud6wdI3116x.facebook
http://www.ted.com/talks/phil_hansen_embrace_the_shake?source=facebook#.Ud6wdI3116x.facebook
Monday, August 25, 2014
Art One - Maria Martinez

Maria Martinez (1887, San Ildefonso Pueblo, New Mexico – July 20, 1980, San Ildefonso Pueblo) was a Native American artist who created internationally known pottery. Martinez (born Maria Antonia Montoya), her husband Julian, and other family members examined traditional Pueblo pottery styles and techniques to create pieces which reflect the Pueblo people’s legacy of fine artwork and crafts.
Martinez was from the San Ildefonso Pueblo, a community located 20 miles northwest of Santa Fe, New Mexico. At an early age, she learned pottery skills from her aunt. During this time, Spanish tinware and Anglo enamelware had become readily available in the Southwest, making the creation of traditional cooking and serving pots less necessary. Traditional pottery making techniques were being lost, but Martinez and her family experimented with different techniques and helped preserve the cultural art.
Creating black ware pottery is a long process consisting of many steps requiring patience and skill. Six distinct processes occur before the pot is ready to be sold. According to Susan Peterson in The Living Tradition of Maria Martinez, these steps include, “finding and collecting the clay, forming a pot, scraping and sanding the pot to remove surface irregularities, applying the iron-bearing slip and burnishing it to a high sheen with a smooth stone, decorating the pot with another slip, and firing the pot."
ART 3 and AP ART - Blog 3 - Bell/Totem and Frankenthaler
3D students - Research bells and totems. Sketch at least two ideas for a bell or totem to be made out of clay. It will be made in parts out of clay. Each piece will be a "bead" and strung vertically on rebar.
2D students - Look at the work by Helen Frankenthaler or Mark Rothko. Recreate one of your favorites in your sketchbook. You can use any material and make sure to fill the page. This should take around two hours.
2D students - Look at the work by Helen Frankenthaler or Mark Rothko. Recreate one of your favorites in your sketchbook. You can use any material and make sure to fill the page. This should take around two hours.
Monday, August 18, 2014
Ceramics - Centering on the wheel - Blog 2
http://www.youtube.com/watch?v=NVP4VVQxeJ8
Watch the above video on how to center the clay.

Art Two - Colored Pencil Techniques - Blog 2

Watch the following two videos. Double click to highlight in blue then click "Go to....." to follow the link. Or you can copy and paste the link in your browser.
They offer some tips for working with colored pencils. Post your thoughts.
https://www.youtube.com/watch?v=DG36Ne7P1c0
https://www.youtube.com/watch?v=l2x9okjb1IA
AP/ART 3 - Blog 2
AP students
1. Create a folder in your "Pictures" folder in your "Library". Label it AP Art. Open that folder and create two folders inside your AP Art folder. Label them "Breadth" and "Concentration".
2. Photograph and edit ALL previous work and summer projects and put into your Breadth folder. 2D folks should only have 2D work (no sculpture or ceramic work) and 3D folks should only have sculpture and ceramic work (no drawings or paintings). 3D students see Tyler Shores to photograph your pieces. Do not wait until the last minute!!!!!! He is busy.
Art 3
Complete your cover design of your sketchbook. You can paint, draw or collage. Get everything glued down and I will Modge Podge them for you. Make sure your name is on the inside. Tip: get some larger sections securely glued down (I would use a glue stick and cover the entire back with glue) and then add your smaller pieces on top. Feel free to work in layers. Or paint and/or draw all over the whole thing. Make it your own!!!
Subscribe to:
Posts (Atom)